A video makes your PowerPoint Presentation more attractive and interesting. Normally, it is easy to insert a video into PPT. Just click "Insert" tab of the ribbon, on the "Media" panel, choose the arrow under "Video", and then choose the appropriate command for inserting your file. But have you ever tried to embed Blu-ray movie clips to your presentation? To embed Blu-ray in PowerPoint means inserting Blu-ray clips physically into PowerPoint so that it can play within the presentation. Sounds cool? Right?
However, inserting Blu-ray clips into PowerPoint will always end in failure, since PowerPoint is not compatible with Blu-ray and it only accepts few video formats including ASF, AVI, MPEG, and WMV. What is the best way to insert Blu-ray clips into PowerPoint Presentation? Now I’d like to show my opinions so as to solve this problem.
Part 1: How to Convert Blu-ray Movie Clips for PowerPoint?
In order to insert the Blu-ray movie to PowerPoint, you can convert Blu-ray to PowerPoint supported video formats first and then insert the converted videos to your presentation.
To finish this task, you can use Pavtube BDMagic (including Windows 10). It lets you rip Blu-ray to all popular video formats and even extract audio from Blu-ray movies. Besides, it also gives you more options and greater control over the video through advanced settings and the built-in video editor allows you to trim, crop, rotate video, add watermarks, etc. to get the very part and effect you want.
If you want to insert movie clips from Blu-ray to PowerPoint on Mac, try the equivalent Mac version – Pavtube BDMagic for Mac, which is compatible with macOS High Sierra, macOS Sierra, Mac OS X 10.11 El Capitan, Mac OS X 10.10 Yosemite, etc.
Just get the right version and follow the guide below to convert Blu-ray to PowerPoint supported video formats and insert videos to PowerPoint presentation.


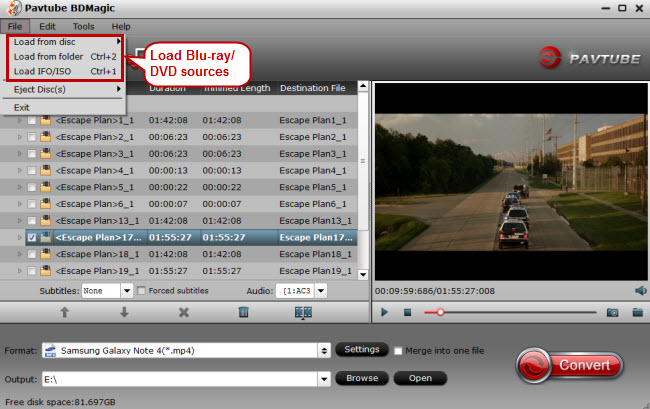
Step 1: Launch Pavtube BDMagic, and click the "File" >" Load from disc" button to load your Blu-ray movies to the program. This software also helps you to insert DVD clips into PowerPoint for presentation.
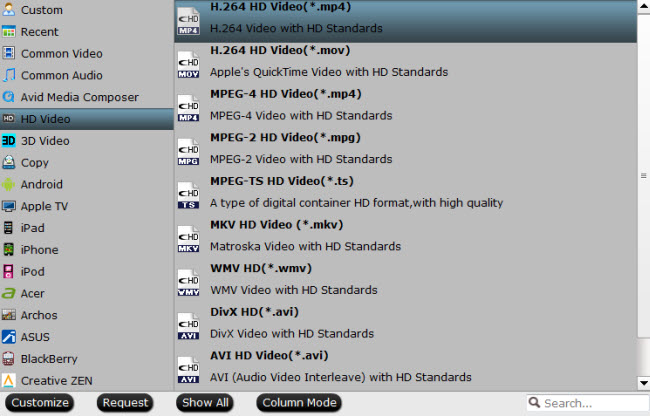
Step 2: Click “Format” drop-down menu, this will display a panel where you’ll select the format you want. Here, we pick MP4 as example.
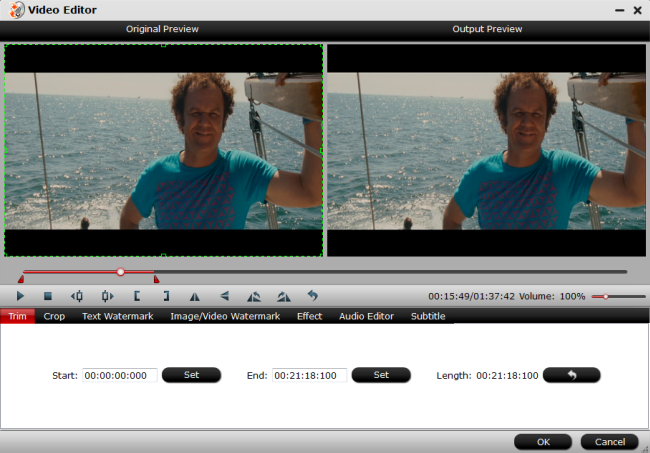
Step 3: You may want to choose a section of Blu-ray movie to show in your PowerPoint presentation, you can use the trim function to cut out unwanted parts from the Blu-ray movies.
Just click  to open “Video Editor” window and switch to the “Trim” tab, you can drag the slider bars to include the segment you want to remain, click the left square bracket to set start point, and click the right square bracket to set end point when previewing the video or directly input specific values to “Start” and “End” box. Some of other editing options are available for you to control your video further.
Step 4: Back to the main interface, and hit the big “Convert” button on the right bottom corner to start the conversion. Just a few minutes later, you will get the converted video.
Part 2: How to Insert Your Converted Video to PowerPoint?
With the converted Blu-ray video file on your computer, you can embed it into your PowerPoint Presentation by following the steps below (Embedding Video from a File):
Step 1: Make sure you have the latest Office updates installed.
You’ll get the best results inserting a video if you have the latest updates installed for Office. Office updates are installed through the Windows Update service.
Step 2: Open the slide you want to add the video to.
You can embed the video on any slide in your presentation.
Step 3: Click the “Insert” tab. This will display the various Insert options.
Step 4: Click the “Video” button in the “Media” section. A small menu will appear.
Step 5: Select “Video on My PC.“ This will open the file browser. If you’re using a Mac, select “Movie from File.”
Step 6: Find the video you want to add.
Use the file explorer to browse for the video file that you want to add. There are a few things to keep in mind when looking for your video file:
a. Different versions of PowerPoint support different sets of video formats. 2016 supports the most types of files, including MP4 and MKV, while 2010 supports the least (just MPG, WMV, ASF, and AVI).
b. Consider avoiding the AVI format, as these often require additional codecs that make playback difficult. See Convert AVI to MP4 for detailed instructions.
Step 7: Wait while the video is added to your presentation.
The time this takes will vary depending on the size of the video. The progress will be displayed at the bottom of the screen.
Step 8: Click the “Playback” tab.
This will allow you to adjust playback settings for the video that you’ve added. If you don’t see the tab, make sure the video has been selected.
Step 9: Use the “Start” drop-down menu to select how the video will start playing.
By default, the video will need be clicked in order for the video to start playing. If you select “Automatically,” the video will start as soon as the slide opens. You can have the video loop or rewind automatically by checking the appropriate boxes.
Step 10: Resize the video by dragging the corners.
You can make the video different sizes by dragging the corners. You can click and drag the video to reposition it on the slide.
Step 11: Save your presentation with your embedded video.
Your video is embedded in the presentation, which includes the video inside of the PowerPoint file. You won’t need to worry about sending the video along with the presentation, since it’s packed into the presentation itself. This means that your presentation file size will increase to include the full video file.
There is no need to do anything special to save the presentation with the embedded file. Just select “Save” from the File tab and save your presentation like you normally would.