


It is very common today to record some videos with our iPhone to share to our family and frends. It is a great fun to see your recorded videos being liked and forwarded by millions of people. Before uploading iPhone footage to YouTube, Facebook, Instagram and other video sharing websites, you may want to edit them. If you are using Adobe Premiere (including Adobe Premiere Pro, Adobe Premiere Pro CS3/CS4/CS5/CS6/CC) , you may encounter some problems when you try to import your iPhone footage to Adobe Premiere for editing. Some people complained that the system always pop up some messages like "File Format not Supported", "Long Time Rendering", "No audio streams found in your file" and kept failing in editing iPhone footage in Adobe Premiere. Why this happening? Don’t worry! This post will give you a quick solution.
Why can’t import iPhone footage to Adobe Premiere for editing?
Generally speaking, the iPhone (including iPhone 7, iPhone 7 Plus, iPhone 6, iPhone 6 Plus, iPhone 5S, iPhone 5, iPhone 5C, iPhone 4S, etc.) records in MPEG-4 and outputs its video files as .MOV (the container) and the iPhone video files are automatically compressed with H.264 codec, which is suitable for delivering on the Internet and playing on media players, but not friendly with Adobe Premiere editing task. So, it will end in failure if you try to import iPhone footage to Adobe Premiere. On this occasion, you need to take some time first to transcode your iPhone videos to Adobe Premiere preferred MPEG-2 files and then transfer the converted iPhone videos to Adobe Premiere for editing.
In fact, it is not very hard to do the trick as long as you get a proper iPhone video converter. And Pavtube iMedia Converter for Mac is just what you need to achieve your goal. This video converter program offers an optimized preset for Adobe Premiere with easy access ( Note: it applies to all kinds of Adobe Premiere including Adobe Premiere Pro, Adobe Premiere Pro CS3/CS4/CS5/CS6/CC). With this tool, you can effortlessly transcode iPhone footage to Adobe Premiere friendly video files like MPEG-2 with optimized settings while keeping the video quality. Meanwhile, it supports batch conversion.


For Windows users, please get help from Pavtube Video Converter Ultimate. Download the program and learn how to convert iPhone files to Adobe Premiere format.
Below is the detailed guide on converting iPhone footage to Adobe Premiere friendly videos for smoothly playback and editing.
How to Edit iPhone footage in Adobe Premiere?
Step 1: Load iPhone Videos
Download and have a quick installation. There is no virus, and no unnecessary bundle apps while downloading. After that, click "Add Video" button to load your iPhone videos. You can load several files at once thanks to its batch conversion function.

Step 2: Output Adobe Premiere editing format
Click the “Format” bar to get the drop-down menu and you can get “Adobe Premiere/Sony Vegas”. Choose “MPEG-2 (*.mpg)” as output format.
Besides Adobe Premiere, this software can also convert iPhone footage to Final Cut Pro, iMovie, FCE, Avid Media Composer and more NLE systems supported video formats.

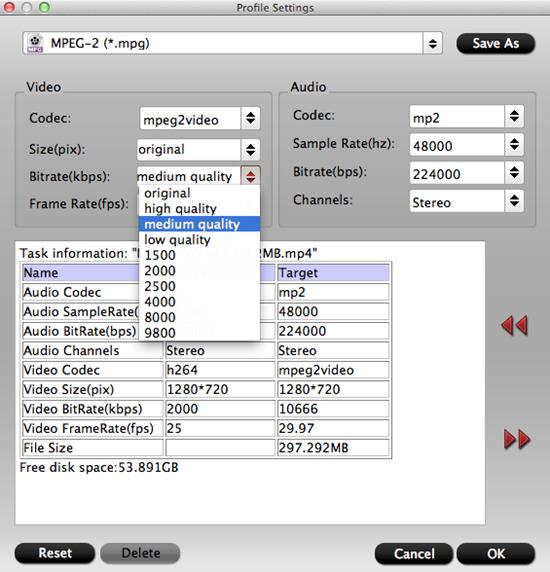
Step 3: Optimize output profile parameters (Optional)
The default setting works well. Of course, if you want to customize video and audio encoding settings, just click the "Settings" button to customize these parameters. You can adjust the output video codec, size, bit rate, sample rate and audio codec, sample rate, bit rate and channels to customize the output files to get the best quality you want.
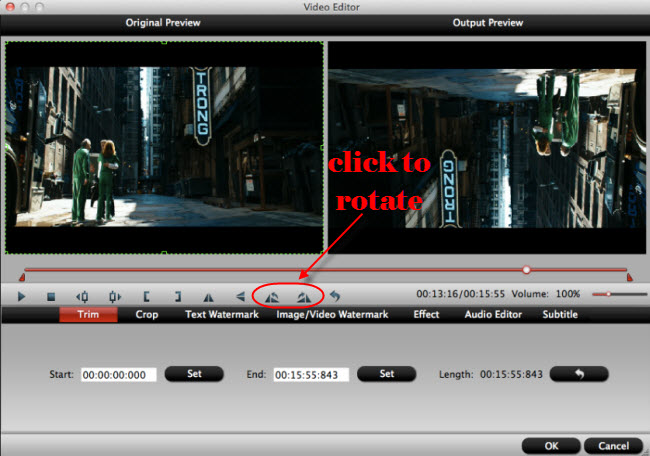
Step 4: Edit iPhone Footage (Optional)
When recording videos with iPhone camera, iPhone will rotate the video automatically depends on how you hold it. But when transferring these videos to other devices, you may find your media player cannot play some of them correctly: some are sideways, some are upside down. Just tick and check the iPhone video you want to edit, hit "Edit" icon (the pencil-like button) on the top to open "Video Editor" window. See the "Rotate" buttons below? Just hit to adjust your iPhone video to correct orientation. Click "OK" to confirm the adjustment.
Note: It’s optional to edit video files before converting. In the "Video Editor" window, you can find a professional video editing package, including trimming, cropping, spliting, merging, adding subtitles, etc.
Step 5: Start iPhone footage to Adobe Premiere conversion
Hit the big red Convert button on bottom of the main windows and the conversion from iPhone footage to MPEG-2 for Adobe Premiere editing will begin immediately.
Once the conversion process finished, click "Open output folder" to get the output videos. Now, you can edit iPhone footage in Adobe Premiere freely.