People often add some video clips or snapshots in their videos to make their videos more attractive when they edit the footage in Adobe Premiere Pro before upload to YouTube and other websites. It is easy for us to edit local video files in Adobe Premiere Pro. But how will you do when the source video is a DVD disc? All of the versions of Premiere Pro don’t support DVD. Is there any solution to edit DVD movies in Premiere Pro? In order to solve this issue, two possible solutions in part one are provided for you.
Part 1: Import DVD to Premiere
Solution 1: Rename VOB files to MPG for Premiere Pro
Put the DVD into your computer player, open the DVD in Explorer, copy the folder Video_TS to your computer. Open the folder and rename all the files with the extension VOB to MPG. That’s it. Premiere will now import them.
Some people saying they get success in renaming the VOB files to MPG and then editing them in Premiere Pro. However, some guys give the feedback renaming the files didn’t work, the files would import but then was unusable in Premiere. In addition, this way seems to work only for non-protected DVDs. If have some commercial DVDs, you may need another solution.
Solution 2: Convert DVD to Premiere editable formats
The more feasible solution is to directly convert DVD to Premiere editable video formats , such as DV AVI, MPEG-2, MP4,etc, and then edit the converted videos in Premiere. To successfully convert DVD to Premiere Pro, Pavtube Video Converter Ultimate (Mac version) will be a great help. Or you can use some other DVD copy softwares.
Pavtube Video Converter Ultimate can directly remove DVD copy protection and shift DVD VOB format to another one such as DV AVI, MPEG-2, H.264, H.265, MP4, ProRes for Premiere Pro editing. Plus, this DVD to Premiere Converter allows you to customize resolution, frame rate, bit rate for video, you can just keep the highest setting to get the ideal output effect. Now download the software and follow the guide below to complete your task.
Step 1. Load DVD movies
After the installation, launch the converter on your PC, click “File” > “Load from disc” to Load DVD from optical drive. Besides DVD, you also can import Blu-ray, ISO to convert to Premiere Pro. After the source disc is loaded, you can preview your movies. Under the preview window, there is a button like a camera. Click it, you can capture picture of your DVD video.
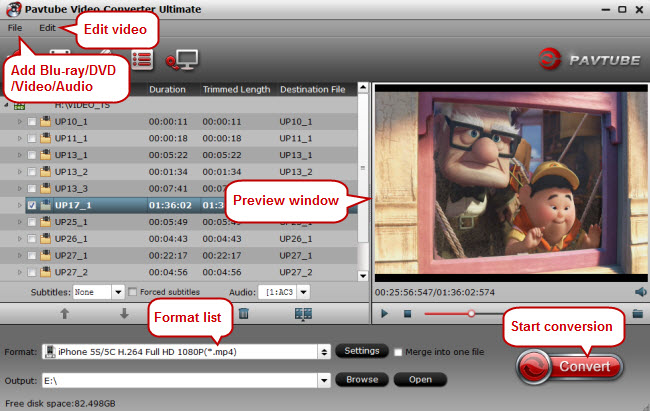
Step 2: Select output file format for Premiere
Click the “Format” bar and switch to “Adobe Premiere/Sony Vegas” option and select “MPEG-2(*.mpg)” as the output format for Premiere. WMV, MOV, MP4 formats are the good choice as well. You also can choose DV NTSC AVI video, or DV PAL AVI video in “DV” category. If you are using a high-end computer and high version Premiere Pro, ProRes format can also be selected.

You can click Settings to adjust video and audio parameters to get the best quality video for Premiere Pro.

Step 3: Start import DVD to Adobe Premiere Pro
Finally, you should be ready to run the DVD to Premiere conversion. Do this by clicking the big “Convert” button on the bottom right of screen. After the conversion finished, you can get the videos highly compatible with Adobe Premiere Pro. Just launch Adobe Premiere Pro and import the converted DVD to Premiere and enjoy editing.
Part 2: Export Premiere to DVD
With Adobe Premiere Pro, you can also export videos to DVD after editing. You can export sequences or portions of sequences in files formatted for authoring and burning to DVD disc or Blu-ray discs. Alternately, you can export to Encore for authoring a DVD or Blu-ray Disc with menus, or direct burning to disc without menus.
How to send a sequence to Encore to create a DVD, Blu-ray Disc, or SWF?
1. In Premiere Pro, select a sequence.
2. (Optional) Add Encore chapter markers, if desired.
3. (Optional) If you are producing a sequence for standard-definition output that includes high-definition clips, select Maximum Render Quality before using Dynamic Link to send the sequence to Encore for DVD authoring. This does not apply to HD sequences that use Dynamic Link for Blu-Ray Disc authoring.
4. Choose File > Adobe Dynamic Link > Send To Encore.
5. On the Basic tab in the New Project dialog box, type a name for the disc into the Name field.
6. (Optional) Click Browse and browse to a location for the Encore project, to change it from the default location.
7. In the Project Settings pane, select the name of the authoring mode desired. The sets of options available in the Settings area and on the Advanced tab depend on whether Blu-ray or DVD is the authoring mode.
8. (Optional) Click Advanced, and select the desired transcoding settings.
9. Click OK. The Encore Project panel contains the dynamically linked Premiere Pro project and sequence. Finish authoring and exporting in Encore.
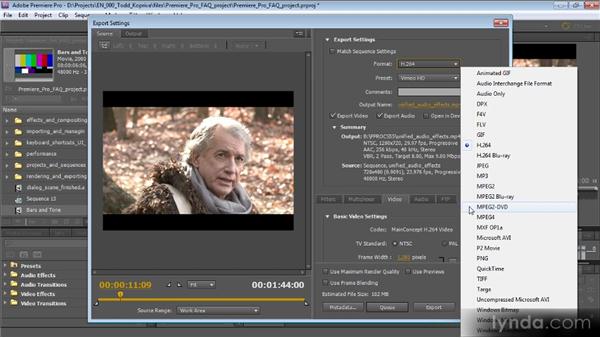
Note: When exporting a file from the Export Settings dialog box for use in DVD or Blu-ray Disc creation, select the format appropriate for the target medium. For single-layer or dual-layer DVD, select MPEG2-DVD. For single-layer or dual-layer Blu-ray Disc, select either MPEG2 Blu-ray or H.264 Blu-ray.
Select the preset for a given format in accordance with the available space on the target medium and the needs of the target audience.