


Want to load your home-made DVD or commercial DVD disc into iMovie for doing some footage editing such as adding special titles, themes, music effects, transition or doing some basic color correction and video enhancement. The following article will show you how to import home-made DVD or commercial DVD to iMovie respectively.

Import home-made DVD into iMovie
1. Open Disk Ultility in Application.
2. Select the disk and then select “New Image”. Save the disk image to Mac.
3. Open iMovie.
4. Mount the new disk image. A “Camera Detected, Scanning Contents” window will appear in iMovie, followed by an import window. You can now import the DVD contents and start editing away.
But since iMovie detects the disk image as video coming from a camera, you can convert your DVD VOB into iMovie natively editing format before importing.
You can perform the conversion by downloading the free MPEGStreamclip for Mac and also the Apple mpeg-2 plugin (which will cost you $20) from the Apple app store.
Load commercial DVD into iMovie
It would be another story to import commercial DVD to iMovie. The encryption on commercial DVD disc like DVD CSS, region code, RCE, Sony ArccOS, UOPs and Disney X-Project DRM will prevent you to make a copy or backup the data on DVD disc. To bypass that protection, you will need a special DVD Ripper program. Although there are many Mac DVD Ripper program on the market, however, if you are looking for an advanced DVD to iMovie Converter program, look no further than Pavtube BDMagic for Mac. The program does the job better than many of its competitors in the following aspects:
— Remove DVD copy and region code protection in the background without installing any third-party plugin.
– Support not only commercial DVD disc but also Video_TS folder and DVD IFO/ISO image file.
– Automatically select the main DVD title (the one with largest file size and longest video length)
– Convert DVD/Blu-ray to all iMovie editable file formats such as MPEG-4, QuickTime movie, MPEG-2, DV and HDV with just few clicks.
– Output DVD to a less processive intensive iMovie editing format – Apple Intermediate Codec for high performance of HD workflow with iMovie on slow performance Mac computer.
– Select desired subtitles and audio tracks from original DVD movies.
– Adjust output profile settings for get the best output video and audio quality for iMovie editing.
– Edit DVD video by trimming, cropping, merging, splitting, adding watermark, applying special effect, adding external subtitles, etc.
– Work perfectly on the Mac OS X El Capitan and macOS Sierra.


How to Rip Commercial DVD for Editing with iMovie on Mac?
Step 1: Load commercial DVD disc.
Run DVD to iMovie converter on your Mac computer, click “File” > “Load from disc” to Load commercial DVD disc into the program. You can also load Video_TS folder or DVD IFO/ISO image files.
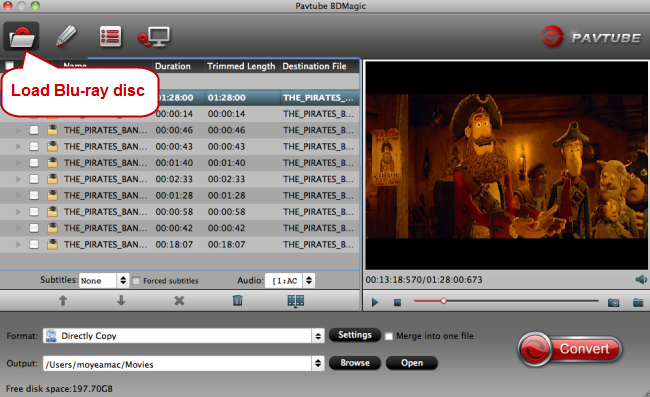
Tips: Under the DVD title displaying list, from “Subtitle” drop-down option, select your desired subtitle language, from “Audio” drop-down list, choose your favorite audio tracks.
Step 2: Output iMovie supported editing formats.
Click “Format” bar, from its drop-down option, choose one of iMovie supported file formats such as MPEG-4, DV, HDV, MPEG-2, AVCHD, here we select to output “MOV – QuickTime(*.mov)” under “Common Video” drop-down list.

You can also select to output “Apple Intermediate Codec(AIC)(*.mov)” to get a high performance and high quality editing workflow of DVD with iMovie on slow peroformance computer.
 http://www.multipelife.com/wp-content/uploads/2014/11/convert-m4v-to-imovie.jpg
Output iMovie AIC format
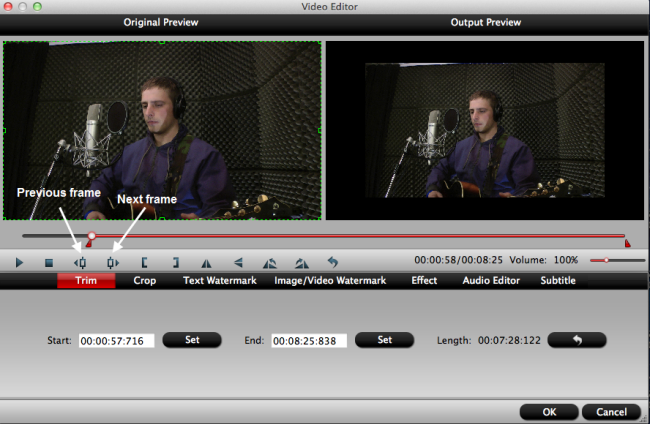
Step 3: Edit DVD files.
Select an item on the main interface to open the “Video Editor” window, here you can flip or rotate video angel, trim video length, crop video black borders, add video/imag/watermark, adjust video color effect, remove/replace audio in video, add external srt/ass/ssa subtitles to video.
Step 4: Begin the ripping process.
After all the setting is completed, go back to the main interface, hit right-bottom “Convert” button to start converting DVD to iMovie supported formats or codec.
When the conversion is finished, click “Open Output Folder” icon on the main interface to pop out the folder with converted files, then you will have no problem to import video to iMovie for Hollywood movie making.
Further Reading:
How to Resize, Crop and Rotate Video Clips in iMovie?
Rip DVD to iMovie/FCE Acceptable File for Editing
Download and Import YouTube Videos to iMovie on Mac
Full Workaround to Import and Edit 4K Video with iMovie
Best Way to Import MKV Files to iMovie for Editing on Mac


Leave a Reply
You must be logged in to post a comment.