Addicted to movies? You can watch video on your tablet, smartphone, or portable media player, of course–but since none of those gadgets have optical drives, you can’t put any of your DVDs into them. There are lots of reasons why you might want to rip and copy a movie from a DVD and store it on your computer. You might want to watch a new DVD on your iPad or tablet (which do not have DVD drives); you might just want to backup your expensive movie collection; another reason might be that your DVD collection is bulging and you want to free up some room in your house (a terabyte hard drive full of movies could save a huge amount of cubic meters in your house). Whatever the reason, here’s how to rip DVDs to your Mac or PC.
Want to watch your DVD on your iPad or tablet? Want to copy your DVD collection to your hard drive or USB stick? Here’s how to do use three Top Apps (Handbrake, DVDShrink, ByteCopy) for Rip a DVD to Windows PC or Mac.
Method 1: The Fastest Way to Rip DVD to PC with Pavtube ByteCopy
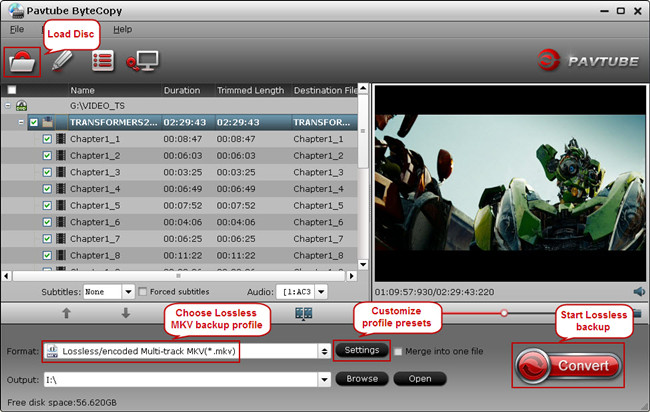
The easiest way to rip DVD movies is by installing Pavtube ByteCopy (for Windows and Mac). With this easy-to-use and fast Blu-ray and DVD ripping tool, you can remove any DVD protection, transcode DVD to any video and audio format including 3D format, and edit DVD to create personal movie.
Plus, it also gets a leg up on other for its dazzling profiles for all popular smartphones and tablets with a wealth of tweaking options. It has picked and built in the best settings based on your destination device. The most important thing is that it offers you a lossless way to backup DVD to MKV with all audio and subtitle tracks and support encoding original DVD to multi-track MP4, MOV, AVI.
Watch out! Ripping a DVD movie can take multiple hours, depending on the speed of your computer.
Good News! To thanks for your continuous support, Pavtube Official Website and Pavtube Facebook are now holding the biggest sale for this 88th Academy Awards with fantastic 50% off discounts and giveaway. Pay less to get powerful Blu-ray/DVD/Video Converter to build your own home media center on this Week of Feb.22~Feb.29 2016!
Free Download and trail:
Other Download:
– Pavtube old official address: http://www.pavtube.cn/bytecopy/
– Cnet Download: http://download.cnet.com/Pavtube-ByteCopy/3000-7970_4-76158512.html
Method 2: How to rip a DVD with Handbrake
Step one
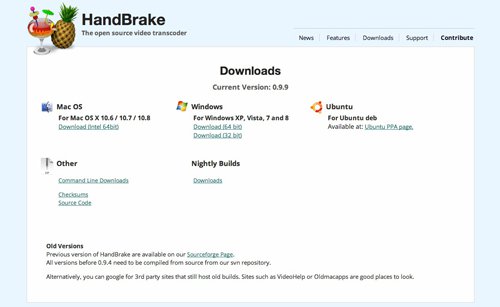
To rip a DVD you have to download specialist software, don’t panic though, we’ve found some DVD ripping software that is free and works brilliantly. Simply go to http://handbrake.fr/downloads.php and select the link for your operating system (Mac, PC and Ubuntu), then install the Handbrake software when the download is complete.
Step two
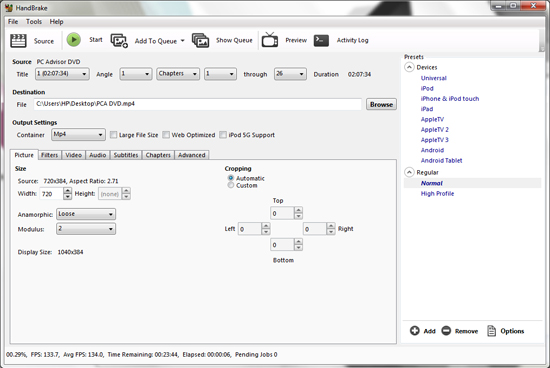
The next thing you need to do is insert the DVD you want to rip into your PCs optical drive and then open the Handbrake program. You then need to click on the Source button located in the top left of the window.
Step three
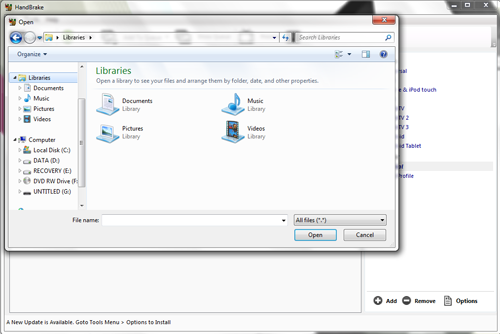
From here you need to locate and select the DVD drive and click open.
Step four
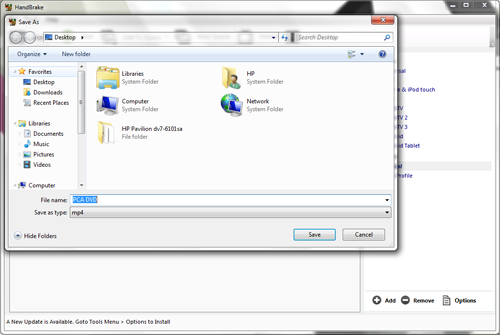
Now that you have select the DVD that you wish to rip, you need to set a destination folder for the ripped content to be saved in. This can be done by clicking on the browse button on the right hand side of the window.
Step five
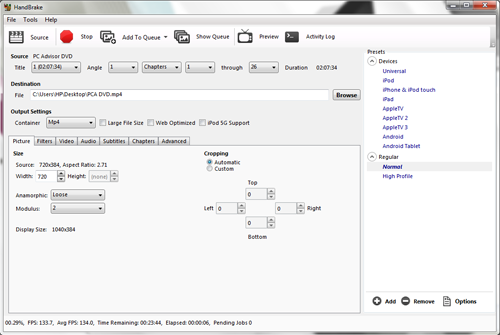
The last thing of note that needs doing is choosing the file preset for your ripped DVD. Handbrake comes with a good list of standard presets for you to chose from (like mp4), so you can rip a DVD to the correct format for popular mobile devices (iPad, Android and more).
Step six
Now you have the Source, the Destination folder and have set which file format you want the DVD to be ripped to, the next and final task is the easiest off all; simply hit the Start button at the top of the Window and let Handbrake do the rest.
Method 3: How to rip a DVD with DVD Shrink
Note: some poeple – but by no means all – have reported issues with DVD Shrink installed malware onto their computers. If in doubt do not download this program, instead use the Handrake software featured above.
Step one
Download a DVD ripping program. There are hundreds of these programs available for download on the internet, some will require you to pay for them, some won’t. We’ve found and tested a program called DVD Shrink, this is free and easy to use.
Step two
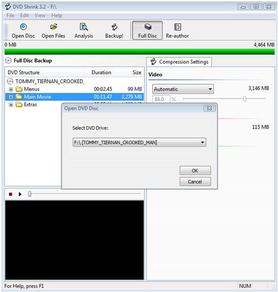
Once you have installed DVD Shrink, click on the ‘Open Disc’ icon near the top rleft of the window, then ensure you have selected DVD drive you want to rip the movie from.
Step three
Before you start ripping a DVD you might want to ‘Shrink’ the file size of your ripped DVD. The smaller the file, the more the quality will be affected. If you wish to do this, click on ‘Edit’ > ‘Preferences’ and in the drop down box on the new window select ‘Custom’ and then enter your desired file size.
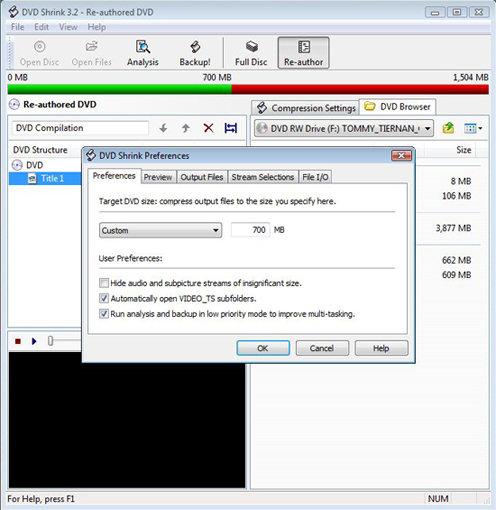
Step four
To avoid ripping unwanted DVD titles of trailers to your storage device, click on ‘Re-author’ at the top of the window, then open the ‘DVD Browser’ tab, after that you need to locate and select the file that is the biggest. This will more often than not be the movie/content you are looking for. If you are unsure, you can preview the file in the bottom left of the screen.
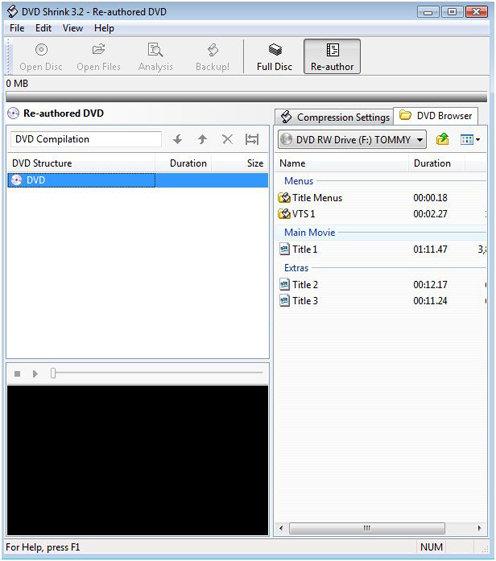
Step five
Click on the ‘Backup!’ button at the top of the window. A new sub-window will then open asking you where you want to save the file. Once you have chosen the file’s destination, click ‘Ok’ and DVD Shrink will start to rip the content on your DVD. A normall DVD should take between 30-50 minutes to rip.
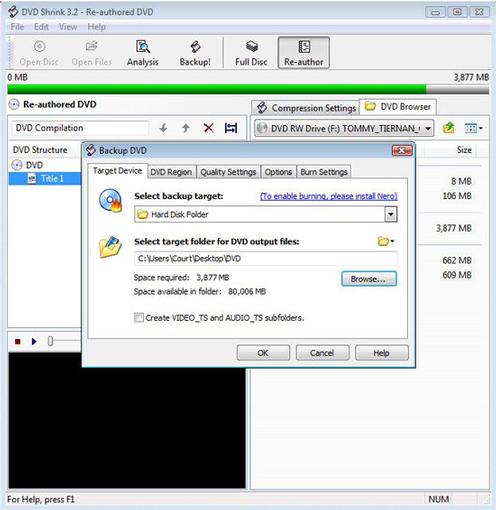
Editor Notes: “Above are the most effective ways of ripping DVDs. And the fastest way I find to backup DVD to PC is use Top DVD Ripper – Pavtube ByteCopy. Now, I don’t worry about disc scratch any more. And it is convenient for me to transfer these DVD movies to other devices for enjoyment, like iTunes.


Leave a Reply
You must be logged in to post a comment.