


If you are like me and are a real movie lover, then you probably have a sizeable Blu-ray/DVD archive. Well, I ripped my movies and put them on my NAS so that I can watch them any time without have to haul out all the Blu-ray/DVDs. The one limitation in the past that I have had is that devices like Chromecast and Fire TV cannot play videos directly from that NAS media server. So, I’m looking for an alternative storage location for these movies and I found Amazon Cloud Drive storage is a good option with the launch of unlimited storage for Amazon Cloud Drive.
One Question Came Out: “Who couldn’t love the idea of the new Amazon Cloud Drive? How to upload my Blu-ray on Amazon Cloud Drive? Which way can help me enjoy the DVD collections on TV via Amazon Cloud Drive?” – Below is the answer.
Best Workaround: Fast Rip Blu-ray/DVD to Amazon Cloud Drive for Storage
Here, you just need a Blu-ray/DVD-ripping utility that can remove Blu-ray/DVD protections and then rip Blu-ray/DVDs to Amazon Cloud Drive for your devices’ supports MP4 or other commen video files.
If you only have to finish DVD Backup, A free option works nearly as well for DVD Backup: perennial favorite HandBrake. It, too, converts DVDs, though it needs a little help to remove copy protection. After installing the program, you have to obtain a file called libdvdcss-2.dll, which you can download from this public archive site. After downloading libdvdcss-2.dll, copy it to the folder where you installed HandBrake—usually C:\Program Files\Handbrake. Now you’re ready to migrate your movies into the all-digital future. Load up HandBrake, and insert one of your DVDs into the PC. Then click the Source button, and choose the location of your disc – on my PC it’s the D: drive. Be patient – it may take a few minutes for HandBrake to read the contents of the DVD. But you’ll find that almost all commercial DVD discs failed to load on Amazon Cloud Drive.
Top Software for Blu-ray/DVD Ripping onto Amazon Cloud Drive
Now that Handbrake doesn’t work to directly copy Blu-ray/DVDs to Amazon Cloud Drive, using Pavtube BDMagic/Pavtube BDMagic for Mac is the best way, it circumvent most copy protection schemes and convert the Blu-ray/DVD discs to the Amazon Cloud Drive – the mobile – or home-theater-friendly format of your choice. Read the review.
This Blu-ray/DVD ripping tool can rip any encrypted Blu-ray/DVD and convert Blu-ray/DVD, Blu-ray/DVD IFO/ISO to MP4, MOV, AVI, MKV, etc popular formats. For the video size limit of Amazon Cloud Drive site, the built-in editor also allows you to extract Blu-ray/DVD clips with the very part you want. Or, you can just choose to rip certain chapters of a Blu-ray/DVD as you like.
Now, you can simply download and install Windows/Mac version at below:


Other Download:
– Pavtube old official address: http://www.pavtube.cn/blu-ray-ripper/
– Cnet Download: http://download.cnet.com/Pavtube-BDMagic/3000-7970_4-75922877.html
TIPS: When you got the troubles of disc loss or damage or the space of physical hard disk is low, you can also ripping Blu-ray/DVDs to cloud lets you upload a personal Blu-ray/DVDs to Cloud Storage devices (like Google Drive, Dropbox, OneDrive, iCloud, Seagate personal cloud media storage, Cloud Storage, Network disk, Plex and Box etc.) enable you can share Blu-ray/DVDs Movies with your family members or access your movies at home or on the road.
How to Backup Blu-ray/DVD to Amazon Cloud Drive for Streaming?
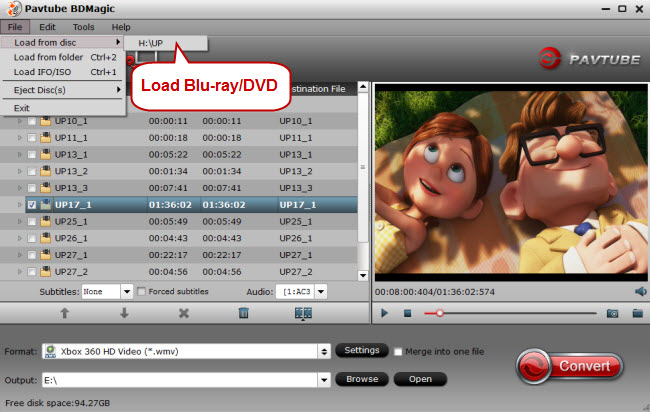
Step 1. Load Blu-ray/DVD movie
Run the Blu-ray/DVD to Amazon Cloud Drive software and click “Load file(s)” icon to load Blu-ray/DVD movies for converting. You can also import movies files from Blu-ray/DVD folder, ISO image files.
Step 2. Set output formats and location
The selection of output format depends on your specific need: If you only need to store your Blu-ray/DVDs to Amazon Cloud Drive, you don’t need to consider about the format matter. MP4 video format in “Common Video” or “HD Video” is recommended. You can also select an common or HD video format as per your needs. If the quantity of DVDs to be saved is large, try to choose the output format with comparatively low quality (for small output size), and oppositely, choose the high quality.

Note: If you desire to play the converted DVDs on Apple TV, iPad, iPhone, Samsung tablet, PS4, Xbox One S, Roku 4 and any of other portable device, you can choose directly from the device profile listed in the “Profiles” that envelops 200+ profiles.
Tip: Since Amazon Cloud Drive has limitations about the uploading video size(If you only have the free account), please pay attention to the video size when ripping Blu-ray/DVD movies for Amazon Cloud Drive. To decide the video size, you can use two methods:
1. click “Settings” to down the size and video bitrate;
2. click “Edit” to trim the Blu-ray/DVD videos to get the very part you want. Besides trimming, cropping, adding watermark, adjusting special effect, are well supported as well.
Step 3. Converting Blu-ray/DVDs to Amazon Cloud Drive for storage
When you finish all settings, click the “Start” button to start ripping the Blu-ray/DVD movie to the digital file accepted by your Amazon Cloud Drive. Movies converted from your Blu-ray/DVD files to 1080p will give great visual quality. The only thing is that the larger files with more pixels will result in much slower conversions. When the ripping is done, you can click on “Find Target” button to locate the ripped movies.
Upload Movie to Amazon Cloud Drive Using the Cloud Drive Website
You can upload your ripped DVD to Amazon Cloud Drive using a compatible web browser. For system requirements, go to About Uploading Files and Folders Using the Cloud Drive Website.
Note:
- The Cloud Drive web uploader requires HTML5, which is supported on Internet Explorer version 10 or greater, Firefox 4, Chrome, Safari (desktop) 6, Safari (mobile) 6.1, Opera (desktop) 12, Opera (mobile) 12, and Android 3. Upgrade to the latest version of your favorite browser to take advantage of the full features of Amazon Cloud Drive.
- At this time, the option to upload entire folders through a web browser is only available for Google Chrome (version 21 and above.)
To upload your files and folders:
1. Go to Amazon Cloud Drive.
2. Click Add Files.
3. Drag and drop files into the window that opens, or click Select Files to browse your files.
4. Choose a destination folder for your files or create a new folder.
Note: You can move your files into a different folder once your upload is complete.
5. Click Add to [folder name].
That’s all. Follow the steps. You should be able to successfully upload DVD to Amazon Cloud Drive.
Tips: Amazon Cloud Drive for Video Producers:
To quickly share a video clip with someone using Cloud Drive, you should compress the video first – especially if it’s HD. Use software such as MPEG Streamclip to lower the bit rate of your video. This will shrink the size of your file making it quicker to upload, download, and stream from the cloud. If you’re a Mac OS Sierra owner, you can use the best MPEG Streamclip Alternative for Mac for your Amazon Cloud Drive.
Read More:


Leave a Reply
You must be logged in to post a comment.