


The newest system of Apple, Mac OS Sierra/Mac OS X 10.11 El Capitan is already generating a lot of interest online. There are a few additions and upgrades that this new OS upgrade will bring to users. After updating the Mac 10.11, you may facing the dilemma, installing and lots of movie files cannot work. Well, you have to know that a number of video converters for Mac have stopped working after updating to the newest Mac OS Sierra/OS X 10.11 El Capitan. In this case, installing and using the best Mac OS Sierra/OS X 10.11 El Capitan Video Converter to convert MKV, FLV, AVI, MOV, etc on Mac OS Sierra/Mac OS X 10.11 El Capitan is the thing you need to do.
Hot Search: H.265 to Mac 10.11| Different Regions DVD on Mac | Blu-rays on Mac El Capitan
Here let’s talk about a suitable Video Converter that really works on Mac OS Sierra – Pavtube iMedia Converter for Mac. (Here is the review.)
What is clear is that iMedia Converter for Mac is compatible with all Mac OS, including Mac OS 10.12 Sierra, 10.11 El Capitan, 10.10 Yosemite, 10.9 Mavericks, 10.8 Mountain Lion, 10.7 Lion, Snow Leopard 10.6, Leopard 10.5. This video converter for Mac OS Sierra/Mac OS X 10.11 is among those most likely to be capable of handling all SD, HD including H.265, MTS, MXF, MOV, MP4 and 4K videos, etc. It is much better capable of converting downloaded YouTube videos to MKV, WMV, MOV, MPEG, iPhone, iPad, Android, etc on Mac OS Sierra/Mac OS X El Capitan at one go. Aside from this, there are many accessible video editing tools that you can find this software for video editing. You can cut, add caption, add audio, and a lot of things to your video.
Free Download this Best Video Converter for Mac OS Sierra:


Other Download:
– Pavtube old official address: http://www.pavtube.cn/imedia-converter-mac/
– Cnet Download: http://download.cnet.com/Pavtube-iMedia-Converter/3000-2194_4-76177788.html
Step-by-Step: Convert HD Videos on Mac OS Sierra
Step 1. Load original Video files. Click “Add Video” button on the main interface to load your MKV, WMV, MOV, MPEG files to the program. (Drag&Drop function is included.)
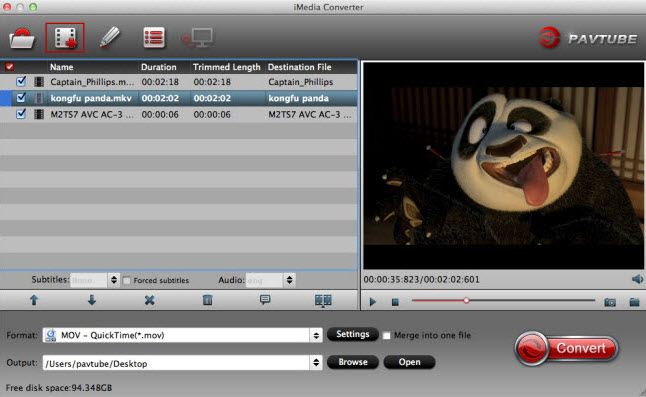
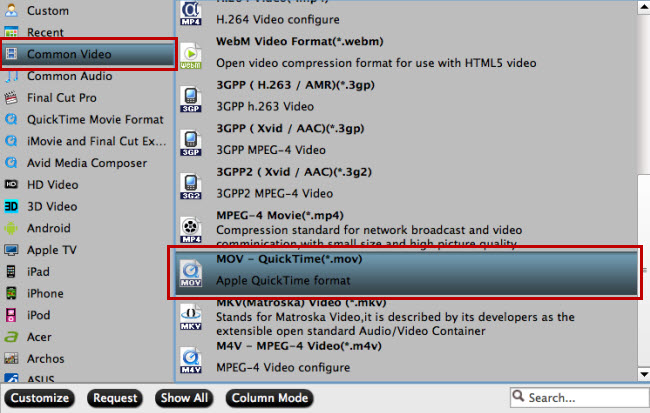
Step 2. Click on the dropdown menu of “Format” and then move your pointer to “HD video” > “H.264 HD Video (*.mp4)” which is the compatible format for Mac.
Tips: With the right settings you can retain the quality of the original videos while also saving space. This is particularly helpful when streaming over your network, depending on your network quality. Simply click Settings bar and you can tweak the settings to your satisfaction and even save it as preset.
Step 3. Start Video to Mac Conversion. Finally, hit the “Convert” button at the bottom of the main interface to start the conversion.
When everything is OK, simply click the Convert button to begin the conversion from MKV to Mac OS Sierra/Mac OS X 10.11 El Capitan format. When the conversion is finished, you can import and play your videos to QuickTime Player, iTunes or transfer them to iPhone, iPad via iTunes with ease.
Tip: For Windows users, Pavtube Video Converter Ultimate is also a helpful app to encode videos for further usage. A nice info is that Even for the latest codec H.265/HEVC, it can hold well. Besides, it also supports encoding to M3U8 by the latest version.


Leave a Reply
You must be logged in to post a comment.