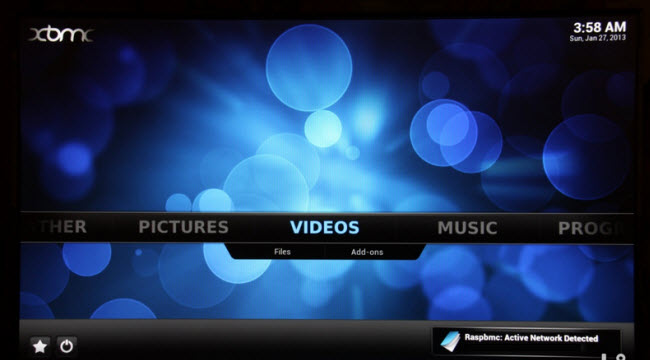
What’s is Raspberry Pi? The Raspberry Pi is a tiny computer that plugs into your TV with a HDMI cable. It decodes 1080p H.264 HD video smoothly, and the XBMC user interface is quite responsive as long as you use a light weight skin. You can also unlock MPEG-2 and VC-1 decoding by purchasing a license from the foundation’s online store. Raspberry Pi so tiny that many people choose to build a multimedia center at home with it and XBMC. Follow this guide to learn how to achieve it.  Part 1. Build a Multimedia Center with Raspberry Pi and XBMC 1. Firstly let’s get a SD card and 3.0 USB stick to start the work. For SD card, I should think of not all the cards are supported but my second try works – it’s a Transcend 32GB SDHC Class 10 (TS32GSDHC10). And Even when the Pi has only USB 2.0, using a USB 3.0 stick with 2.0 sockets will give much better read times. 2. Next step, download and launch the Raspbmc installer, run XBMC. The Raspbmc distribution is created and maintained by Sam Nazarko and you can download the latest version here. I will use the Windows installer in this tutorial. Before launching the application, plug-in the SD card reader and unplug any other USB storage devices to make sure you will not format an incorrect drive by accident. Now, launch the Raspbmc installer application and select the SD card reader from the devices list. As mentioned earlier, it is recommended to use a USB stick as a storage partition on the Raspberry Pi, so tick the box on “Install Raspbmc to a USB drive”. After clicking the “Install” button, it will take less than a minute while the installer downloads and restores the image to the SD card. 3. The last step, insert the SD card and USB stick to Raspberry Pi. After plugging in the memory card, USB stick, USB keyboard or remote control, Ethernet cable and power adapter, the computer will boot up and the installer program will run for about 15-20 minutes. The Raspbmc will boot up the computer once the installer script is ready. Congratulations, now you have Raspberry Pi XBMC ready to use!
Part 2. How to stream/play DVDs with XBMC on a Raspberry Pi on TV?
As is mentioned before, RasPi only support H.264 HD videos natively. So how can we watch DVDs on RasPi plugged in to TV at home? Here I choose to convert my DVD collections (they have been made into ISO files) to H.264, stream it to NAS for playback. To accomplish this, I did a lot of researches online and finally choose this Pavtube DVDAid for its easy-to-use interface, various output presets and reliable video quality. Mac version is available here: Pavtube DVDAid for Mac
How to convert DVD movies to H.264 for playback via Raspi?
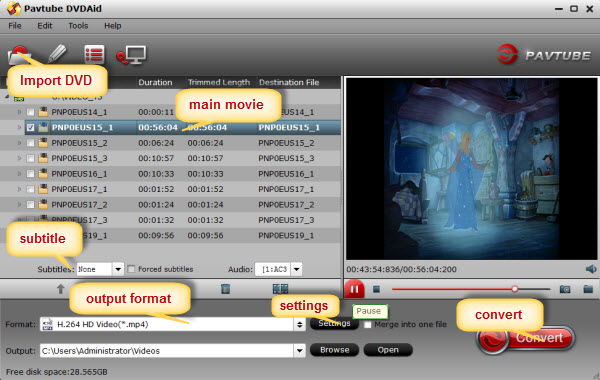
Step 1. Click the disc button to browse and import DVD disc from ROM, or load the ISO/IFO files that you want to convert for viewing on Raspberry Pi.

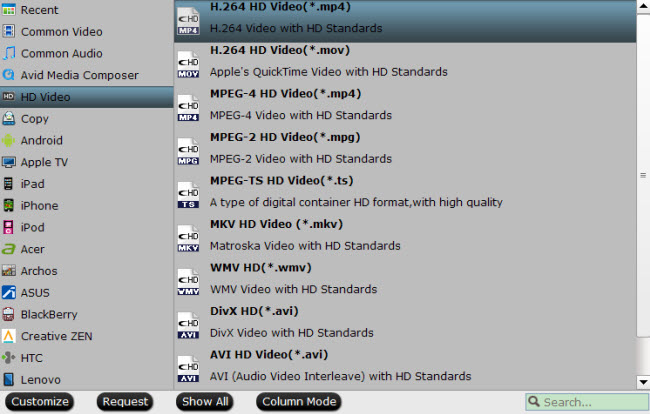
Step 2. Click the dropdown menu between “Format” and “Settings” to choose target video format. There are various presets sorted of device model and programs. For RasPi, we need to choose “HD Video>H.264 HD Video (*.mp4)” as below:
Step 3. adjust target file specs (optional)
If you are not satisfied with the default video specs, click “Settings” to change target video size, bitrate, frame rate and audio settings. Step 4. Now hit the big red “Convert” to start converting rental DVD movies to H.264 with best settings for playback via Raspberry Pi on TV.
After the conversion, you can get the converted DVD rips in *.mp4 format by clicking the “Open” or “Open output folder” icon. Ok done, the H.264 MP4 files for RasPi are ready now! Copy the H.264 MP4 files to NAS and follow this guide to learn how to set your TV, so that you can playback DVD movies on TV via Raspberry Pi.


Leave a Reply
You must be logged in to post a comment.