In the OS landscape, Android is by far the most widely used for tablets and mobile devices. Whether it’s for a wedding video, a sport highlight film, or some other project, more and more people have their video footage recorded by Android device these days. After shooting a video with your Android smartphone or tablet, you may need to edit it for better quality and make it more fantastic. As an ideal video editing tool, Adobe Premiere is widely used by video professionals. If you have got Adobe Premiere and want to edit Android video, you will definitely use Adobe Premiere as the Android video editing tool.
However, when importing Android video to Adobe Premiere for further editing, you may encounter some obstacles like “unsupported video files”. How to edit Android video in Adobe Premiere successfully? Well, in this article, we will introduce an efficient way to fix the incompatibility issues between Android videos and Adobe Premiere.
Adobe Premiere Supported Video Formats
Adobe Premiere (including Adobe Premiere Pro, Adobe Premiere Pro CS3/CS4/CS5/CS6/CC) supports several audio and video formats, making your post-production workflows compatible with the latest broadcast formats:
Video: 3GP, 3G2(.3gp), Apple ProRes 64-bit, ASF, AVI, DV, DHxHD, F4V, M2T, M2TS, M4V, MOV, MP4, MPEG, MPE, MPG, M2V, MTS, MXF, VOB, WMV, etc.
Audio: AAC, MP3, AIFF, AIF, ASND, M4A, AC3, etc.
Actually, the videos you shot by your Android device mostly are 3gp or mp4 format video, which may contains a video codec incompatible with Adobe Premiere. For example, MP4 in H.265/HEVC codec can’t be dealt with Adobe Premiere and may prevent users to enjoy this editor more. To solve this problem, you need to take some time first to transcode your Android videos to Adobe Premiere preferred MPEG-2 files and then transfer the converted Android videos to Adobe Premiere for editing.
How to Convert Android Video to Adobe Premiere on Mac with ease
To convert Android video to Adobe Premiere, Pavtube iMedia Converter for Mac (Review) will be a great help. As a Mac friendly program, its user-friendly interface and powerful capacity is suitable for both novice and pro alike Mac users. It can effortlessly convert Android video to MPEG-2 favored by Adobe Premiere on Mac (including macOS 10.13, macOS Sierra, Mac OS X 10.11 El Capitan, Mac OS X 10.10 Yosemite, 10.9 Mavericks, 10.8 Mountain Lion, 10.7 Lion, 10.6 Snow Leopard, etc). Plus, you can also trim, crop, add effect and merge files, etc. This Mac Android to Adobe Premiere Converter allows you to customize resolution, frame rate, bit rate for video, you can just keep the highest setting to get the ideal output effect. For Windows users, get the equivalent Windows version Pavtube Video Converter Ultimate. Now download the software and follow the guide below to complete your task.
How to Edit Android Video in Adobe Premiere?
Step 1: Load Android videos
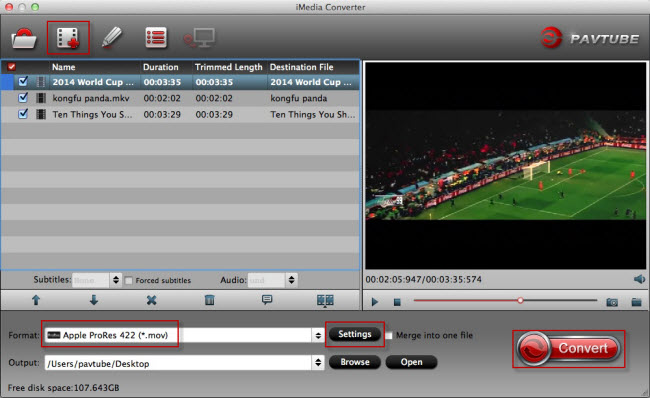
Run the best Android video Converter on Mac and click “Add videos” button to load your videos for conversion.
Note: Batch conversion is supported, so you can load more than one Android videos to save time. You can also check the “Merge into one” box to join several files together.
Step 2: Choose a format for Adobe Premiere
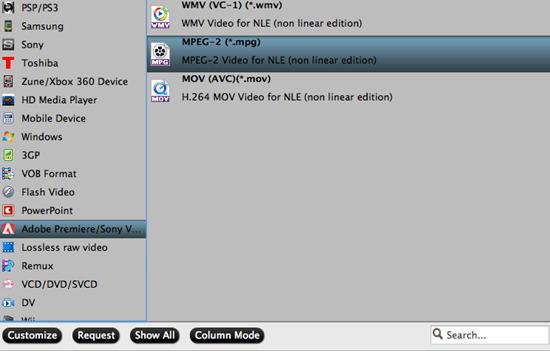
Click “Format” drop-down bar to select a proper video format. For editing Android videos in Adobe Premiere, “Adobe Premiere/Sony Vegas"> “MPEG-2 (*.mpg)” is the most suitable editing format.
Besides Adobe Premiere, this software can also convert Android video to Final Cut Pro, iMovie, Avid MC, Davinci Resolve and more NLE systems supported video formats.
Step 3: Edit Android videos (Optional)
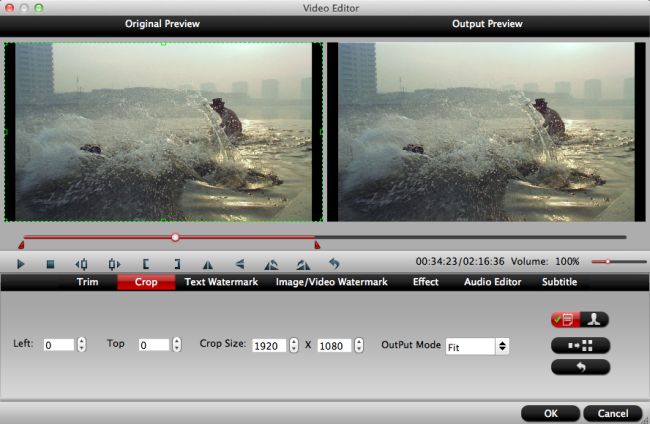
On the top tool bar on the main interface, click the pencial like icon to open “Video Editor” window, you can trim Android video to remove the unwanted parts by setting the start and end time, crop to remove the black borders or unwanted area by dragging the dash line around the video frame, flip video, add text/image/video watermark, change video picture effect, replace/remove audio in video, add external subtitles, etc.
Optimize output profile parameters (Optional)
The default setting works well. Of course, if you want to customize video and audio encoding settings, just click the “Settings” button to customize these parameters. You can adjust the output video codec, size, bit rate, sample rate and audio codec, sample rate, bit rate and channels to customize the output files to get the best quality you want.
Step 4: Begin the conversion
Click the “Convert” button to start Android video to Adobe Premiere upported editing codec conversion process. When the conversion is completed, you will have no problem to import video to Adobe Premiere for high quality and high performance post video editing.


Leave a Reply
You must be logged in to post a comment.