


What is hardware acceleration? How to enable/disable hardware acceleration in Windows 10? Is there a great hardware-acceleration video transcoder to speed up video transcoding on Windows 10? In this article, we would like to discuss hardware acceleration in Windows 10, including its definition, why and how to enable/disable it in Windows 10, and hardware-accelerated video transcoder which can greatly speed up video encoding/decoding speed.
What is hardware acceleration in Windows 10?
In simple terms, the term Hardware Acceleration means using computer’s hardware for performing a certain task and function faster than would be possible using a software. The hardware able to perform acceleration process is called hardware accelerators. GPU is an example of hardware accelerator which can offload the task from CPU to lead a faster and steadier playback of videos and games. Sound card is another example to deliver higher-quality sound playback and recording. Instead of handling anything with CPU, hardware accelerators take over specific tasks with greatly improved execution.
Why and How to Enable/Disable Hardware Acceleration in Windows 10?
To utilize hardware acceleration, the performance of an application can be significantly improved if you have a strong GPU. In addition, video encoding/decoding, editing/rendering will be greatly speeded up on a computer with CPU including Intel QSV or graphic card featuring Nvidia NVENC.
On the other hand, hardware acceleration turns to be inactive when the computer is armed with a powerful processor but weak components. Also, some problems may happen due to the use of hardware acceleration. For example, you’d better disable hardware acceleration in Chrome to fix black screen issue when playing a video.
In the following, we will lead you to enable/disable hardware acceleration in Windows 10.
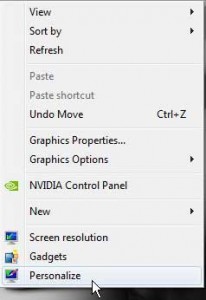
The Hardware Acceleration tab in Windows allows you to specify the performance of the graphics hardware present on your PC. To disable or reduce Hardware Acceleration in Windows 10/8/7, first, right-click on the Desktop and from the context menu, choose the Personalization option.
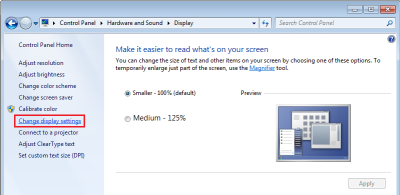
Then, select Display from the left panel of the window and click on ‘Change display settings’.
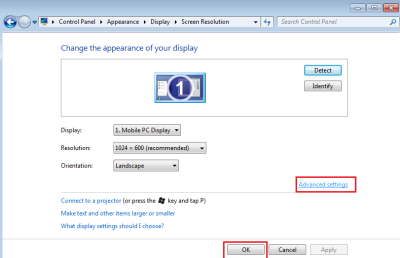
Next, click on ‘Advanced settings’.
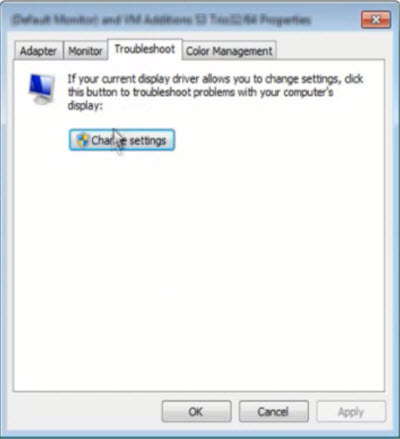
This will open the Graphics Properties box. Now open ‘Troubleshoot’ tab. If your current display driver does not allow you to change the settings, you will see the Change settings button grayed out, and you will not be able to change the settings.
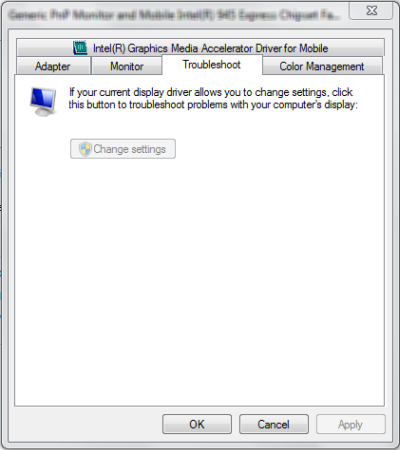
If your current display driver allows you to change the settings, you will be able to see the Change settings button. Click on it.
Now, the Display Adapter Troubleshooter will appear on your computer screen. Move the pointer to the extreme left to disable or reduce the hardware acceleration and click on OK. If you are having problems with your graphics hardware, these settings can help you troubleshoot display-related problems.
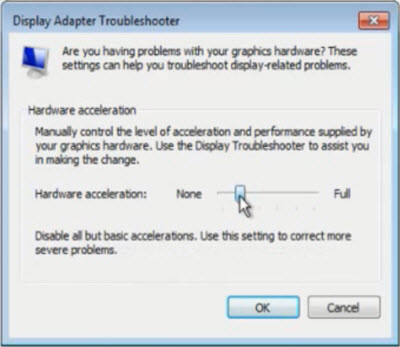
Tip: If you find that the option is grayed out, check if your hardware permits it and ensure that you have updated drivers.
What Is the Best Hardware-accelerated Video Transcoder for Windows 10?
Hardware acceleration is supported by a lot of programs and browsers producing smoother video playback and editing process. Therefore, many video transcoders utilizes hardware acceleration in order to quicken video decoding and encoding.
Pavtube Video Converter Ultimate is a highly-acclaimed video converter for Windows featuring hardware acceleration option. As long as your PC are running on a CUDA-enabled Graphics card, the H.265/HEVC, H.264 encoding speed of Pavtube Video Converter Ultimate can be accelerated about 30X faster than before.
What you can do with this fastest Nvidia encoder software?
– Encode Blu-ray disc, BDMV folder and ISO image to H.265/H.264 MP4 for 4K TV viewing.
– Encode DVD Disc, Video_TS folder, IFO and ISO image file to H.265 MP4/MKV, H.264 MP4/MOV/MKV for enjoy on smarttphone or tablets smoothly with perfect quality.
– Convert common video to H.265/H.264 for streaming with Wowza engine.
– Adjust output profile settings such as video codec, bit rate, resolution, frame rate, audio codec, bit rate, sample rate and channels, etc to get better output quality of H.265/H.264 video.
– Decode H.265 to H.264 or other popular file formats or devices and program preset profile formats.
– Fast H.264 codec encoding speed with a PC that running on a CUDA-enabled Graphics card or an AMD graphics card with AMD APP technology
Quick guide to enable hardware acceleration in Pavtube Video Converter Ultimate for speeding up video conversion
1. Download and install Pavtube Video Converter Ultimate on Windows 10.

2. Import video or load Blu-ray/DVD disc into the program.
Start the program on your computer, click "File" > "Add Video/Audio" to import digital file formats into the program, for load Blu-ray or DVD disc, insert your DVD disc into your computer’s optical drive and your Blu-ray disc into an external Blu-ray drive, click "File" > "Load from Disc" to load Blu-ray/DVD disc into the program.

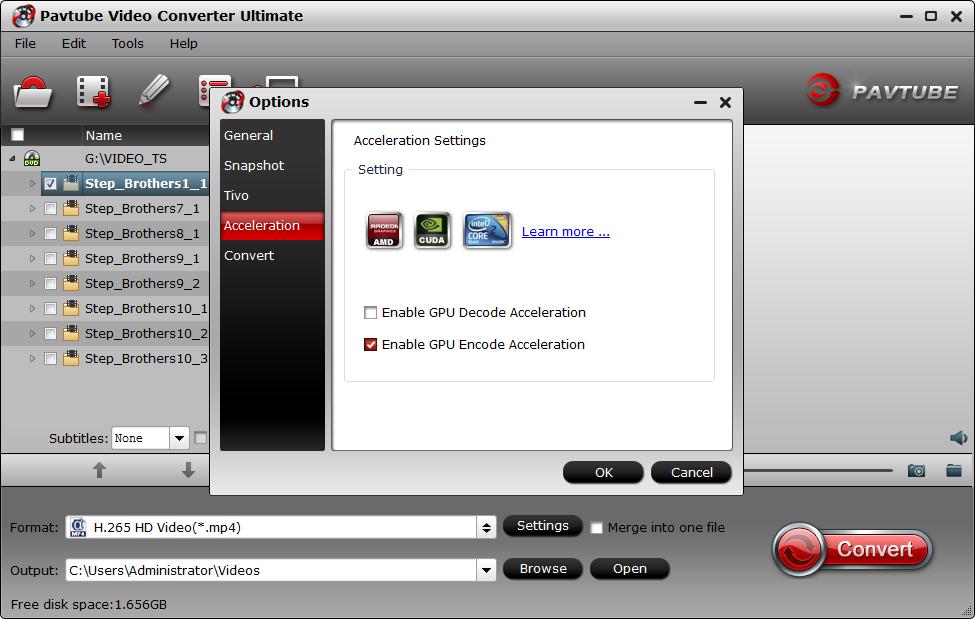
3: Enable GPU Encode Acceleration.
Click "Tools" > "Options", in the opened "Options" window, click "Acceleration" menu, then check "Enable GPU Encode Acceleration" otpion so that the program will accelerate converion speed when encoding video/Blu-ray/DVD to H.265/H.264 codec.
4: Output H.265/H.264 Video Formats.
Click "Format" drop-down bar, scroll down to select "Common Video" > "H.265 Video(*.MP4)" or "H.264 Video(*.MP4)"as the output file format. You also can choose other H.265/H.264 video formats as you like.

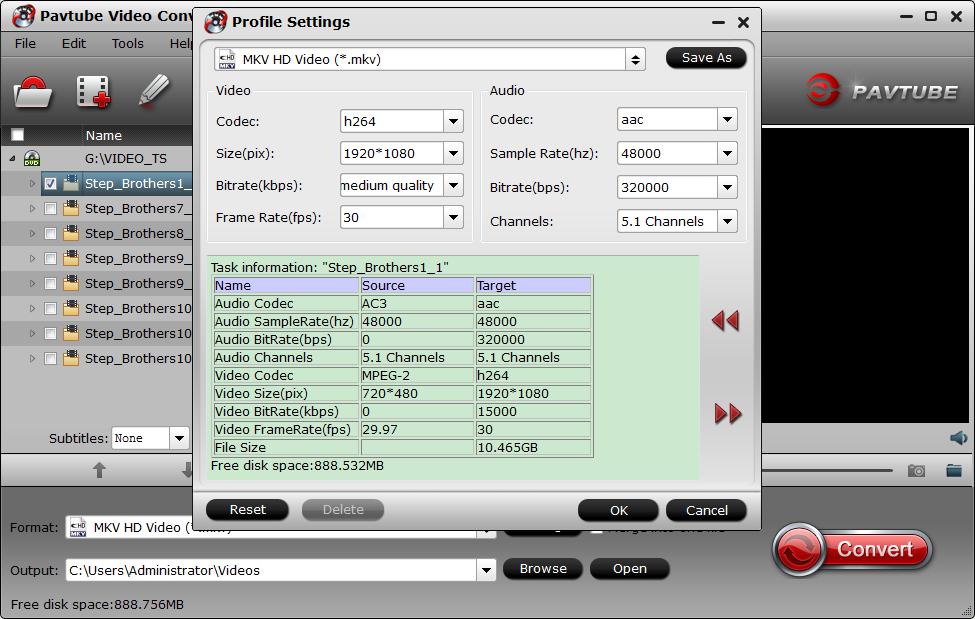
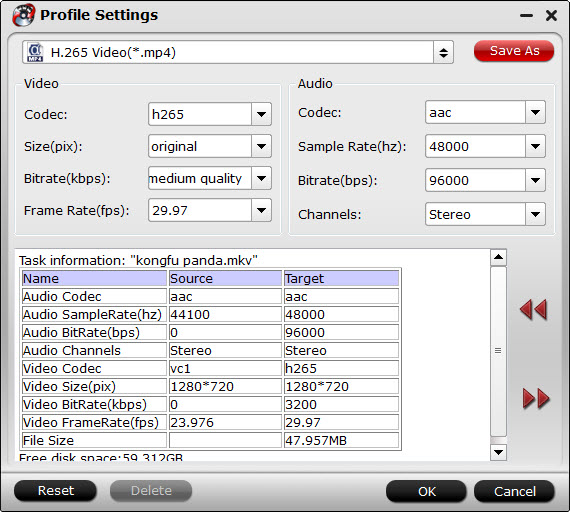
For outputting H.265 MKV format, select "HD Video" > "MKV HD Video(*.mp4)" to output, then hit "Settings" on the main interface to open "Profile Settings" window, under Video settings panel, click "Codec" drop-down selection, choose "H.265" as your final output file codec.
5. Adjust output file parameters (Optional)
You are allowed to adjust video and audio parameters if you are not satisfied with the default settings. Presets like size, bitrate, frame rate, audio channels, etc. can be customized in your own way.
5: Begin the H.265/H.264 codec encoding process.
After all settings is completed, hit right-bottom "Convert" button to begin the conversion from video/Blu-ray/DVD to H.265/H.264 encoding process.
When the conversion is completed, you will get a perfect quality H.265/H.264 file with smaller file size for smoothly viewing and streaming on different devices.
Related Articles
Any Product-related questions?support@pavtube.com